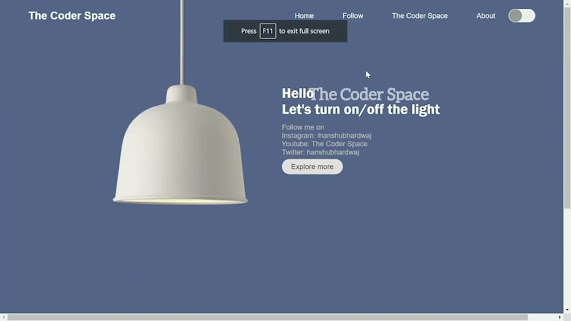
Turn on & off Lamp using HTML & CSS & JS
HTML frames are used to divide the browser window into multiple sections where each section loads a separate HTML document. In this project we are going to make a webpage that will ON and OFF a bulb on user’s click. We will be using HTML frame and frameset feature and some CSS to design our ON and OFF button.
Approach:
1: We want to create a file like index.html which has images of on/off lamp.
Below is the implementation of the above HTML code:
<!-- The Coder Space -->
<!DOCTYPE html>
<html lang="en">

<head>
    <meta charset="UTF-8">
    <meta name="viewport" content="width=device-width, initial-scale=1.0">
    <title>Lamp || The Coder Spaec</title>
    <link rel="stylesheet" href="style.css">
    <script src="script.js" defer></script>
</head>

<body>
    <div class="hero">
        <nav>
            <!-- <img src="menu.png" class="menu-img"> -->
            <h2>The Coder Space</h2>
            <ul>
                <li><a href="#">Home</a></li>
                <li><a href="#">Follow</a></li>
                <li><a href="#">The Coder Space</a></li>
                <li><a href="#">About</a></li>
            </ul>
            <button type="button" onclick="toggleBtn()" id="btn"><span></span></button>
        </nav>
        <div class="lamp-container">
            <img src="lamp.png" class="lamp">
            <img src="light.png" class="light" id="light">
        </div>
        <div class="text">
            <h1>Hello <br>Let's turn on/off the light</h1>
            <p>Follow me on<br> Instagram: ihanshubhardwaj <br>Youtube: The Coder Space <br>Twitter: hanshubhardwaj </p>
            <a href="#">Explore more</a>
        </div>
        <div class="thanks">
            <h2><a href="#"> Copyrights Reserved </a></h2>
        </div>
    </div>
    <footer class="footer">The Coder Space</footer>
</body>
</html>
-- The Coder Space
2. Second step is create a CSS file whose name is style.css
Below is the implementation of the above CSS code:
/* The Coder Space */
* {
    margin: 0;
    padding: 0;
    font-family: 'poppins', sans-serif;
    box-sizing: border-box;
}

.hero {
    background:#566389;
    /* min-height: 100vh; */
    width: 100%;
    color: #fff;
    position: relative;
    margin-left:auto;
    margin-right:auto;
}

nav {
    display: flex;
    align-items: center;
    padding: 20px 5%;
}

nav .menu-img {
    width: 25px;
    margin-right: 20px;
    cursor: pointer;
}


/* nav .logo {
    width: 11%;
    cursor: pointer;
} */

nav ul {
    text-align: right;
    flex: 1;
}

nav ul li {
    display: inline-block;
    list-style: none;
    margin: 0 30px;
}

nav ul li a {
    text-decoration: none;
    color: #fff;
}

button {
    background: #efefef;
    height: 30px;
    width: 60px;
    border-radius: 50px;
    cursor: pointer;
    border: 0;
    outline: 0;
    transition: 1.4s;
}

button span {
    display: block;
    background: #999;
    border-radius: 50%;
    height: 29px;
    width: 29px;
    margin-left: 1px;
}

.lamp-container {
    position: absolute;
    left: 20%;
    top: -16%;
    width: 200px;
}

.light {
    position: absolute;
    left: -179%;
    top: 98%;
    opacity: 0;
    transition: opacity 1.4s;
}

.text {
    width: 700px;
    margin-left: 50%;
    margin-top: 120px;
}

.text h1 {
    font-weight: 700;
    font-family: 'Franklin Gothic Medium', 'Arial Narrow', Arial, sans-serif;
}

.text p {
    padding: 2% 0px;
    color: #c0bfbf;

}

.text a {
    text-decoration: none;
    color: rgb(74, 73, 75);
    background: #e3e0e0;
    border-radius: 50px;
    padding: 8px 21px;
}

.thanks {
    margin-left: 75%;
    margin-top: 350px;
}

.thanks a {
    color: cornsilk;
    font-weight: 400;
    font-family: system-ui, -apple-system, BlinkMacSystemFont, 'Segoe UI', Roboto, Oxygen, Ubuntu, Cantarell, 'Open Sans', 'Helvetica Neue', sans-serif;
}

.active {
    background: green;
}

.active span {
    background: #fff;
    margin-left: 29px;
}

.on {
    opacity: 1;
}

.footer {
    text-align: center;
    background: #9d9e9f;
    padding: 10px;
}
-- The Coder Space
3. Third step is create a JS file whose name is script.js
Below is the implementation of the above JS code:
// The Coder Space
const btn = document.getElementById("btn");
const light = document.getElementById("light");

console.log(btn);

function toggleBtn() {
    btn.classList.toggle("active");
    light.classList.toggle("on");

}
--The Coder Space
Output:
--The Coder Space
Thankyou Guys!
!! Jai Hind !!


